Welcome to AI Subtitle Creator! This guide will walk you through everything you need to start generating professional subtitles for your movies and TV shows.
Step 1: Activate Your License
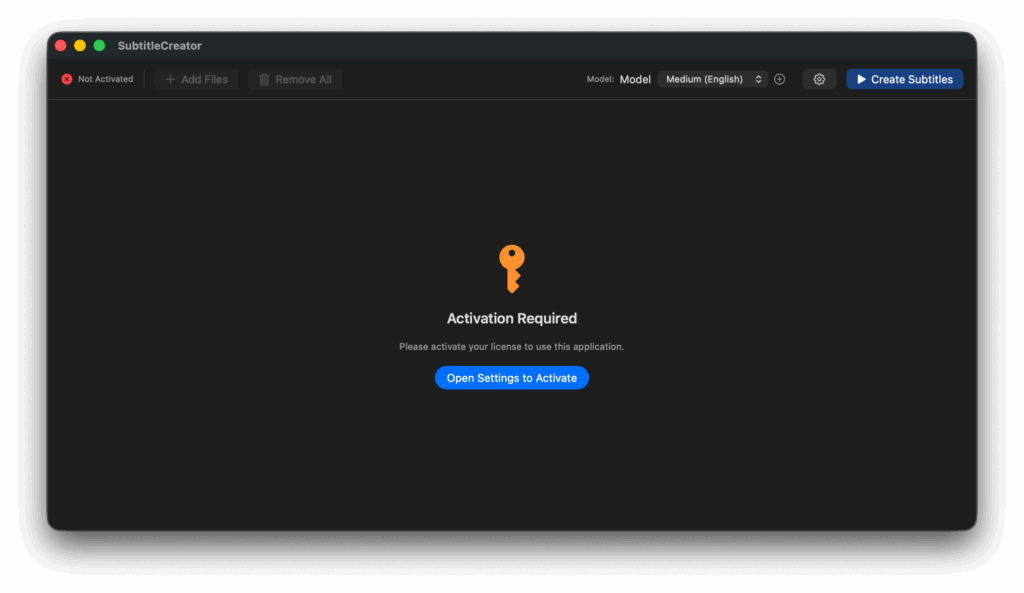
Before you can use Subtitle Creator, you need to activate your Gumroad license key.
Where to Find Your License Key
- Check your purchase email from Gumroad
- Visit your Gumroad Library: https://app.gumroad.com/library
- Your license key looks like:
XXXXXXXX-XXXX-XXXX-XXXX-XXXXXXXXXXXX
Activating Your License
- Open Subtitle Creator
- When you first launch, you’ll see the activation screen
- Click “Open Settings to active”
- Paste your license key into the “License Key” field
- Click “Activate”
- Wait a few seconds for verification
- You’ll see “✅ Activated” when successful
Troubleshooting:
- ❌ “Invalid license key” → Double-check you copied the entire key
- ❌ “License already activated” → Each license allows 3 activations. Deactivate from another device first.
- ❌ “No internet connection” → Activation requires internet. Try again when connected.
To access activation later:
- Go to Settings (gear icon) → Activation tab
Step 2: Download Dependencies
Subtitle Creator needs two components to work:

FFmpeg
FFmpeg extracts audio from your video files.
How to Install:
- Open Settings (gear icon)
- Go to Engine & Models tab
- Find the “FFmpeg” section
- Click “Download FFmpeg”
- Wait 30-60 seconds for download to complete
- Status will change to “✅ Installed”
What if it fails?
- Check your internet connection
- Make sure you have ~100MB free disk space
- Try clicking “Download FFmpeg” again
Whisper
AI Subtitle Creator uses the Whisper engine for transcription. Click the Download button to automatically download the latest Whisper version.
All files are saved to the ~/Library/Application Support/SubtitleCreator/ folder.
Step 3: Download an AI Model
AI models do the actual transcription. You need at least one model to generate subtitles.

Opening Model Manager
- Open Settings (gear icon)
- Go to Engine & Models tab
- Click “Manage Models” button
- The model selection window appears
Choosing Your First Model
For most users, we recommend:
Small (Recommended)
- ✅ Best balance of speed and accuracy
- ✅ Works great for most movies and TV shows
- ✅ Download size: ~466 MB
- ⏱️ Processing time: 2-hour movie = ~10 minutes on M1 Mac
Other options:
Tiny (150 MB)
- Fastest processing
- Lower accuracy
- Good for: Clean dialogue, quick tests
Base (142 MB)
- Fast and decent quality
- Good for: Simple videos, tight deadlines
Medium (1.5 GB)
- Higher accuracy
- Slower processing
- Good for: Challenging audio, accents
Large v3 (3.1 GB)
- Maximum accuracy
- Slowest processing
- Good for: Professional work, pristine audio
Large v2 (3.1 GB)
- More stable for noisy scenes
- Good for: Action movies, heavy background music
- Note: Can have repetition issues (automatically fixed)
Downloading a Model
- Find your chosen model in the list
- Click the “Download” button
- Watch the progress bar
- When complete, you’ll see a green checkmark ✅
- The model is automatically selected (blue outline)
- Click “Done”
Download Times (on good internet):
- Tiny/Base: 30-60 seconds
- Small: 1-2 minutes
- Medium: 3-5 minutes
- Large: 5-10 minutes
Troubleshooting:
- Download stuck? Cancel (X button) and try again
- Not enough space? Free up disk space in your Downloads folder
- Models are stored in:
~/Library/Application Support/SubtitleCreator/whisper-cpp/models/
Switching Models Later
You can download multiple models and switch between them:
- Main window → Top toolbar → Model dropdown
- Click to select a different installed model
- Or click + button to download more models
Step 4: Add Your Video Files
Now you’re ready to create subtitles!
Adding Files – Method 1: Drag & Drop
- Drag video files from Finder into the Subtitle Creator window
- Drop them anywhere in the window
- Files appear in the list instantly
Adding Files – Method 2: Add Files Button
- Click “Add Files” button in the toolbar
- Browse to your video location
- Select one or more files
- Click “Open”
Supported Formats
✅ MKV – Most common for movies/TV shows
✅ MP4 – YouTube downloads, recordings
✅ MOV – Apple/iPhone videos
✅ AVI – Older format
✅ Most other formats – If VLC can play it, we can subtitle it
What You’ll See
After adding files, you’ll see:
- Filename – Auto-detected movie info (e.g., “Movie: The Matrix (1999)”)
- Duration – Loads automatically in a few seconds
- Audio – Number of audio channels (e.g., “2 ch”, “5.1 ch”)
- Size – File size
- Lang – Source language (English)
- Translation – Optional translation target
- Hint – Bubble icon to add context for better accuracy
Adding Movie Context (Optional but Recommended)
For better accuracy, add character names:
- Click the bubble icon (💬) next to the file
- You’ll see auto-detected movie info
- Add character names:
Movie: The Matrix (1999) featuring Neo, Trinity, Morpheus - Click “Done”
Why this helps:
- ✅ Better proper noun recognition (character names, places)
- ✅ Fewer mistakes on uncommon names
- ✅ Higher overall accuracy
Step 5: Generate Subtitles
You’re ready to create subtitles!
Basic Subtitle Generation
- Make sure at least one video file is in the list
- Click the “Generate Subtitles” button (▶ Play icon)
- Watch the progress:
- “Extracting audio…” (~5% of total time)
- “Detecting speech segments…” (if VAD is enabled, ~10%)
- “Generating subtitles…” (~85% of total time)
- When complete: “✅ All subtitles created successfully!”
Where Are My Subtitles?
Subtitle files (.srt) are saved next to your video files.
Example:
- Video:
/Movies/The Matrix (1999).mkv - Subtitle:
/Movies/The Matrix (1999).en.srt
To use them:
- Open video in VLC, Plex, Jellyfin, or any player
- Subtitles load automatically (same filename)
- Or manually select the .srt file in your player
Processing Time Estimates
On Apple Silicon (M1/M2/M3):
- 30-minute video: 2-5 minutes
- 1-hour video: 5-10 minutes
- 2-hour movie: 10-20 minutes
Factors that affect speed:
- Model size (Tiny fastest, Large slowest)
- Video length
- Audio complexity
- Mac processor (M3 > M2 > M1)
Batch Processing (Multiple Files)
Process entire TV seasons at once:
- Add multiple video files to the list
- Click “Generate Subtitles”
- The app processes them one by one
- All .srt files appear next to their videos
Status shows:
- “Processing 2 of 5: Breaking Bad S01E02.mkv”
- Individual progress for each file
Advanced Features
Translation (Coming soon)
Generate subtitles in multiple languages:
- Enable translation in Settings → Translation
- Add your Gemini API key (free tier available)
- In the file list, use the Translation dropdown
- Select target language (Turkish, Dutch, German, etc.)
- Generate subtitles – you’ll get both English and translated files
Output files:
Movie.en.srt(English)Movie.tr.srt(Turkish)Movie.nl.srt(Dutch)
Fine-Tuning (Settings → Fine-tuning)
Voice Activity Detection (VAD)
- ✅ Enabled by default
- Filters silence to prevent hallucinations
- Recommended: Keep ON for movies
Use Previous Context
- ❌ Disabled by default (recommended for movies)
- Prevents error cascades in action scenes
- Enable for: Interviews, lectures, podcasts
Temperature
- Default: 0.0 (most accurate)
- Higher = more creative (not recommended for subtitles)
Filter Non-Speech Audio
- Default: 0.6
- Removes background noise, music
- Increase to filter more aggressively
Filter Uncertain Words
- Default: -1.0
- Removes words Whisper isn’t confident about
- Increase toward 0 to be more conservative
Filter Repetitive Text
- Default: 2.4
- Removes stuttering and repetition
- Decrease to 2.0-2.2 if you see repeated words
Beam Size
- Default: 5
- Higher = more accurate but slower
- Range: 1-20
Time Offset
- Default: 0.0s
- Shift all subtitles forward (+) or backward (-)
- Use if subtitles appear too early/late
Troubleshooting
“No subtitles generated”
Check:
- ✅ License activated?
- ✅ FFmpeg installed?
- ✅ Model downloaded and selected?
- ✅ Video file has audio?
“FFmpeg not found”
- Go to Settings → Engine & Models
- Click “Download FFmpeg” again
- Wait for “✅ Installed” status
“Model not found”
- Settings → Engine & Models
- Click “Manage Models”
- Download your desired model
- Select it from the top toolbar
Subtitles appear too early/late
- Settings → Fine-tuning
- Adjust Time Offset
- Positive values (+0.2s) = subtitles appear later
- Negative values (-0.2s) = subtitles appear earlier
- Regenerate subtitles to apply changes
App is slow
Speed up processing:
- Use a smaller model (Tiny/Base/Small)
- Reduce beam size to 1-3
- Ensure VAD is enabled (it’s faster)
- Close other apps to free up RAM
Quality isn’t good enough
Improve accuracy:
- Use a larger model (Medium/Large)
- Add movie context (character names)
- Increase beam size to 8-10
- Adjust fine-tuning thresholds
Next Steps
You’re all set! Here’s what to try next:
✅ Process your first movie – Try a 2-hour film
✅ Batch process a TV season – Add all episodes
✅ Add character names – Click the bubble icon to improve accuracy
✅ Try translation – Generate multilingual subtitles
✅ Experiment with models – Download and compare Small vs Large